Fill-in
Master the art of the graffiti fill-in. Learn definitions, historical context, and professional spray paint techniques from expert artists at Graffitifun.
The fill-in is a core pillar of graffiti terminology, representing the internal life of a piece of urban art. While the outline provides the structure, the fill-in is the area where colour, style, and personality truly shine. From the iconic silver "bombs" of the 1980s to the intricate, multi-coloured gradients seen in modern murals, the fill-in is a technical skill that every aspiring aerosol artist must master. In this comprehensive guide, we explore the history, techniques, and cultural significance of the fill-in, drawing on years of professional experience from the Graffitifun artist collective. Whether you're a curious beginner or looking to refine your technical precision, understanding the fill-in is the key to unlocking the full potential of spray paint as a medium. 🚀
In the world of urban art, the fill-in (often simply called the "fill") is the physical heart of a graffiti work. While the outline defines the shape and the tag provides the signature, the fill-in is where the artist breathes life into the letters through colour, texture, and technical prowess. Whether it is a simple monochromatic layer in a quick throw-up or an intricate multi-layered gradient in a complex piece, understanding the fill-in is essential for anyone looking to master aerosol art.
The fundamental definition of a fill-in
A fill-in refers to the internal colouring of the letters or characters in a graffiti work. Traditionally, a graffiti piece is constructed in stages: the sketch (skeleton), the fill-in (meat), and the outline (skin). The primary purpose of the fill-in is to provide solid coverage within the boundaries of the letter forms, making the work visible from a distance and providing a canvas for further 🎨 aesthetic details like graffiti shading techniques.
In technical terms, the fill-in is the area between the force-field (outer aura) and the inline. In a professional workshop setting, we often describe the fill-in as "the soul of the letter." Without a clean, solid fill, the most technical outline in the world will look hollow and amateurish. Achieving a "solid" fill means there are no "holidays"—a slang term for missed spots where the background surface peeks through the paint.
Historical context: From silver pieces to technicolor dreams
The evolution of the fill-in tracks perfectly with the technological advancement of spray paint. In the early 1970s New York scene, fill-ins were rudimentary. Artists often used whatever paint was available, leading to thin, translucent layers. However, as the culture grew, so did the ambition for higher visibility.
The "Silver" era
One of the most iconic historical developments was the "silver" or "chrome" fill-in. Graffiti writers discovered that chrome/silver paint had a higher pigment-to-solvent ratio, allowing it to cover dark or rusted surfaces (like subway cars) in a single pass. This led to the rise of the "Silver Piece," a staple of the throw-up graffiti culture. These were high-contrast works that dominated the visual landscape of the 80s.
The transition to technical fills
As dedicated graffiti paint brands emerged, offering high-pressure cans and specialized nozzles (caps), the fill-in evolved from a solid block of colour into a space for experimentation. Writers began incorporating "bubbles," "cracks," "fades," and "patterns" inside the letters. This shifted the focus from how fast one could fill a space to how intricately one could decorate it.
Visual characteristics and technical styles
Not all fill-ins are created equal. Depending on the intended style of the artwork, the fill-in can take several forms:
- Flat Fill: A single, solid colour applied evenly. This is common in "bombs" or quick street pieces where speed is essential.
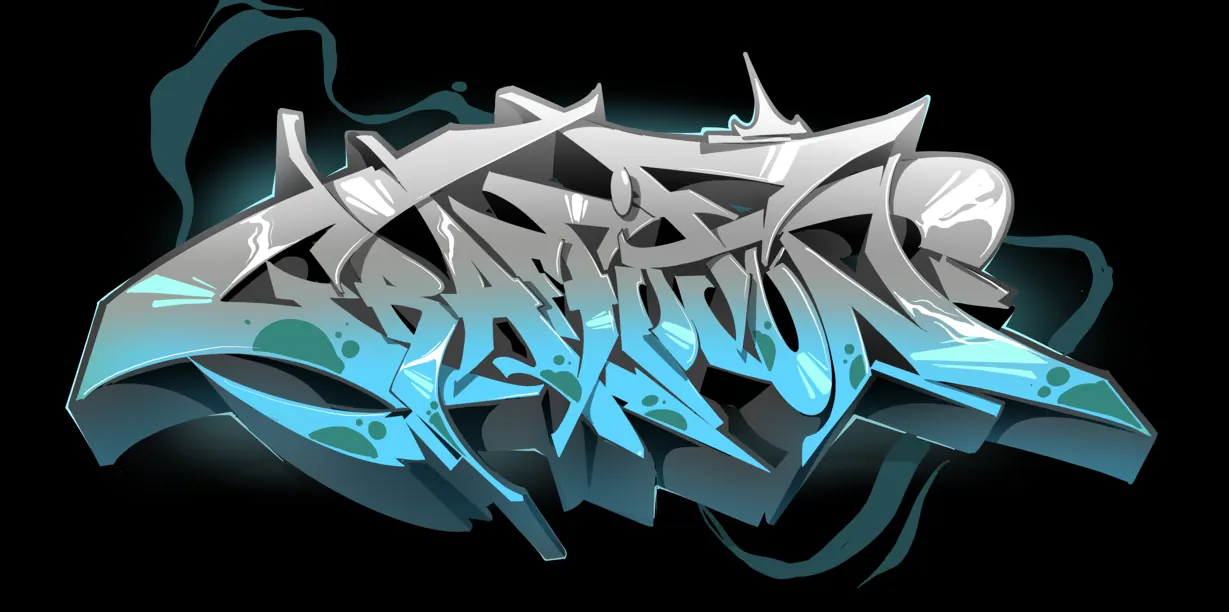
- Fade/Gradient: A smooth transition between two or more colours. This requires high levels of can control and is a hallmark of a professional graffiti piece.
- Pattern Fill: Using secondary colours to create internal textures like geometric shapes, "inner-outer" glows, or "electric" bolts.
- 3D/Bevelled Fill: Using lighter and darker shades of the same hue to simulate three-dimensional volume within the flat letter plane.
Practical workshop application: Learning the fill-in
When we host graffiti workshops, the fill-in stage is usually the most satisfying for participants. It is the moment when the artwork stops looking like a wireframe and starts looking like a "real" graffiti work. However, there is a specific technique involved that our professional artists teach to ensure a high-quality finish. 🖌️
The "Z" motion
To get a solid fill without drips, we teach the "Z" or "S" motion. Instead of pointing the can and spraying randomly, the artist moves the can in horizontal rows, overlapping each pass by about 50%. This ensures even distribution of paint and prevents the "tiger striping" effect common with beginners.
Pressure control
In a workshop environment, especially during branding workshops, we emphasize the importance of pressure. A fill-in doesn't always need to be "full blast." By using soft-touch techniques, participants can create misty backgrounds or subtle transitions that add professional depth to a corporate mural.
Difficulty level: Beginner to Advanced
The difficulty of a fill-in is deceptively high. While it seems like "just colouring in," the physical demands of maintaining a consistent distance from the wall while traversing large areas can be exhausting.
- Beginner: Focusing on achieving a solid, opaque layer without drips or streaks.
- Intermediate: Mastering two-colour blends and simple horizontal fades.
- Advanced: Executing complex wildstyle fills where multiple colours interact across interlocking letter forms, often involving "bubbles" or "transparent" effects.
Common misconceptions about fill-ins
"The fill-in is just for hiding the wall." Many believe the fill-in is purely functional. In reality, a well-executed fill-in can define the mood of the piece. Warm colours can make the art feel aggressive or energetic, while cool bleeds can make a mural feel calm and integrated into its environment.
"You should always fill before you outline." While this is the standard "Graffiti 101" approach, many advanced artists use a "cut-back" technique. They might do a rough fill, outline it, and then go back into the fill to clean up the edges or add highlights. It is a constant dialogue between the interior and exterior of the letter.
"Thick paint is better for fill-ins." While high opacity is good, paint that is too thick will take forever to dry and may sag or drip. Professional artists look for "high-coverage" paint that remains thin enough to work with technical precision.
The cultural relevance of the fill-in
In the wider global graffiti scene, the fill-in is a mark of a writer's "shelf life." If a piece's fill-in starts to fade or "buff" (deteriorate) quickly, it is often seen as a sign of poor quality materials or lack of experience. Conversely, a fill-in that remains vibrant for years is a testament to the artist's technical choice of pigments and application methods. 🌟
In modern street art, the fill-in has also become a site for political and social messaging. Sometimes, the fill-in itself contains smaller images, text, or textures that tell a secondary story within the larger letters of the piece.
Conclusion: Why the fill-in matters
Whether you are participating in leadership development through graffiti or just picking up a can for the first time, mastering the fill-in is your gateway to artistic expression. It is the bridge between a simple tag and a complex masterpiece. It requires patience, physical coordination, and an eye for colour theory.
Expert attribution
This article was authored by the Graffitifun editorial team, drawing on over a decade of hands-on experience in the global urban art scene. Our professional graffiti artists have executed thousands of fill-ins, from high-speed street works to meticulous corporate murals. We pride ourselves on passing this technical knowledge down through our structured workshops, ensuring that every participant—regardless of skill level—understands the nuances of aerosol application and the rich history of the craft.
Frequently asked questions
Keep reading
Ready to Create Your Masterpiece?
Book your graffiti workshop today and discover the artist within! It's going to be AWESOME!